Pins and supplies for making them

Pins

I have been making pins for conventions since 2001.  Shrink plastic, air dry clay, polymer clay, laser cut, bottle cap pins,  resin shapes,  and standard pin back  buttons.   I have been asked by conventions to make them and also just made them as giveaways year after year and now it is hard to stop as people have a collection of them and ask about them every year.  This is an overview of the different pins I have created and will be adding step by step instructions to these.  Of course there are other mediums out there that can be done at home as well.

Airdry Clay

Pin made from air dry clay

Air dry clay, handmade stamp, chalk and silver sharpie.

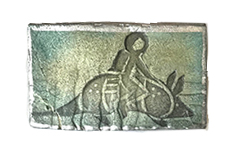
I started out making air dry clay pins.  I was on an HGTV show called Crafters Coast to Coast years ago and at the time spent a lot of time making polymer clay and air dry clay art.  Air dry clay is a very approachable medium as you don’t need to bake the clay in an oven.   I made a pin for Armadillocon by creating a stamp of an astronaut riding an armadillo.  Stamped it into the wet clay with a black ink and then after the piece was dry colored the clay with stamp pads and a silver sharpie.  It was then sealed with an acrylic sealer.

Shrink Plastic

Shrink plastic is always a fun medium because well… didn’t you ever play with Shrinky Dinks?  If you haven’t you are missing out.  My favorite way to create pins is buy the pre sanded material.  The smooth side is where the design is outlined and the rough side is where you fill in the color.  It gives the piece a slightly dimensional look.  And in fact you can use more than one layer of shrink plastic for an even more 3d effect.  I have done these pins sealed and unsealed but I must warn you that sharpie tends to wear off if they are not sealed.  To color in the pins I have found that prismacolors are the right level of waxiness and are good for shading and blending two colors together.

Polymer Clay

Aged penguin pin

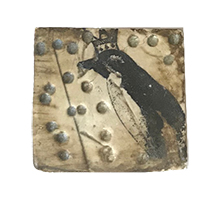
Polymer clay, transfered image, and patina

Have I mentioned I have gin in the craft room?  Cheapest I could find?  That is for the polymer clay pins I have created.  With polymer clay you can transfer a toner copy onto the polymer clay. I have used this a number of times for not only pins but also for guest gifts.  The pin to the right has a clipart image of a penguin that a crown has been drawn onto and photocopied. The polymer clay can then be colored with pigment powders and chalks to give it some color.  There are a number of techniques to transfer images on to polymer clay but this one for me was the easiest and most reliable.

Bottle cap pins

Lonestarcon 3 Salsa tasting party giveaways

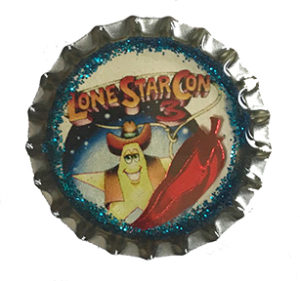
Printed background, glitter,pepper confetti, and resin.

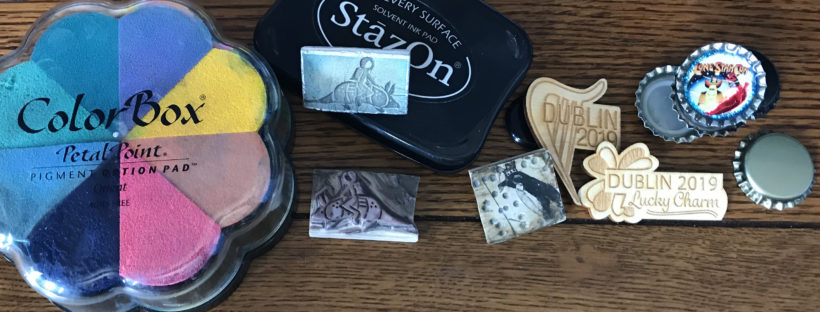
I made bottle cap pins for numerous conventions including Lonestarcon 3 and The World Fantasy Convention in Austin. The bottle cap pins are now everywhere and there are a lot of different instructions out there.  I would find a brass charm in the theme of the convention, create a background on the computer and then glue it all into a bottle cap.  After letting it sit for at least a day  using either Diamond Glaze or resin I would seal the whole thing.  I will admit the Diamond Glaze and other craft glazes are not waterproof and so they will not last as long as sealing with resin.

Resin and Molds

When I was fen guest of honor at Fencon I felt a giveaway would be a nice thing to give out to attendees for supporting my work.  I found some great ice cube trays at Michaels that I thought fit my art in the art show.  Using resin, pigments and glitter I made a bunch of the ray guns and rocket ships and made them into pins and necklaces. These days there are molds for just about any shape which you can find in the baking section of any craft store. The best ones for resin are shiny molds. Textured molds will leave a rough and sometimes cloudy looking surface on the finished piece.

Laser cutting

Laser cut pins for Dublin 2019

Laser cut and etched.

Laser cut and etched pins are fun and take a lot of the assembly work out of the equation.  Typically for my pins I start with a sketch then with illustrator I customize the design for printing on the laser.  I have sent the design to a laser shop or have cut it myself at a maker space in town.  I have done pins in a variety of materials, bamboo,  mdf, felt, and acrylic. There is a number of other materials that lasers can be used on from metals to paper.

Image for DIY Selfie Kit header

DIY Selfie Kits

For MidAmeriCon II I was a deputy division head for Marketing.  We were always trying to come up with new ideas for social media and getting people to take pictures at conventions to help promote the convention.  Happy people who were interested in our convention and look here is a fun way to show you are supporting MidAmeriCon II!  Hence the DIY Selfie Kit was born.

The idea was simple.  Make your own props for pictures you take around Kansas City.  Each kit had two sheets of props to cut out, popsicle sticks and the table was supposed to have a set of scissors and tape.

DIY Selfie Kit: The PDF of the final art.

DIY Selfie kit imageGood idea in principle… wrong execution.  The table sitters didn’t understand the idea behind it.  So as a marketer I didn’t explain the purpose to my audience-  the people who were promoting the convention at the fan tables.

Now I have worked on conventions that could have made this successful.  But it really depends on the audience and the person who is promoting the convention.  I see this working for a convention with a younger audience because of their interactions with social media.  People who want to take selfies and are really enthusiastic about the convention.

To make this:  I used something like this icon set.  I resized them to make them large enough for a person’s face and added trim lines around the images to show where to cut them out and to make it very obvious what these were for.  The visual lines are quickly recognizable rather than having to read the text, because as we have seen people really don’t read the text all that often.

They were then put in bags with the popsicle sticks because unlike me, I figured most people don’t have popsicle sticks laying around but are more likely to have glue or tape they can use.


Armadillocon Flyer

One page flyers

Years ago I was really into mail art.   Decos (handmade books where people decorate a page), ATCs (Artist Trading cards), Zines, and artist stamps… each project was different and I really enjoyed organizing the swapping.  Then the website I did my trading on went down and the fun kind of fizzled out. I still love the idea of a one page zine but also it can be used for a marketing piece as well.

But two of the handmade book layouts stuck with me, the one page book layout. This post is about the first version and Tor.com has a very elaborate example of this here:  https://www.tor.com/2009/03/10/idiots-opw1/.  With a convention that has a small budget the ability to have an 8 page layout on a single letter size sheet of paper is an interesting idea.  It focuses the attention of the reader to one concept at a time rather than trying to seperate the information through layout of the brochure.

I see this type of flyer as a general piece about the convention.  This works when trying to convince a person to come to a convention you want to showcase the location of the convention and whatever strength the convention has without being too wordy.  For example, Armadillocon has a very literary focus.  BBQ.  Bats that come out from the Congress Avenue bridge every night during the summer. Great guests.

Edited to add-  these days you can have a page with a QR code for more information instead of just the website information on the piece.  That can lead to a specific landing page or just your standard website but it gives the person something to take home with the basic information in their hands.

One page flyers

On to the project:

The flyer below is a sample file for you to attempt to fold your own flyer. It is a quick layout I created for my local convention ArmadilloCon.

Basic Armadillocon layout

In terms of layout you need to know which panel will be the front and the back of the flyer.

Drawing of the pages of the one page flyer

If you look at the Tor version you notice you can pretty much make any of the panels the front and back.  Their layout is more dynamic the way the images are drawn the story can be seen folded to create multiple version.

This version I have created is static.

Layout the design you want for your little book.  The front and back have all the basic convention information, where, when, how much,  website for purchasing memberships.  Then the next two pages are the overview of the convention, what happens at the convention and past guests.  And finally, something about why you would want to visit Austin.  Pretty basic.  (Again really quickly put together so I would hope your grammar is better than mine as well as the content is a bit more focused and targeted to the audience)

Depending on what kind of printer you are using you cannot lay out the text to the edge of the sheet and print at home. I played around for a while trying to find a good width for the outside pages and a good height for all the pages.

Now how to fold the piece.

If you want a layout with the pages marked off for you to try yourself I have included that as well.

Basic layout

Crafting for Conventions -why?

I have a relatively small niche in the convention running world-  I work on a lot of marketing related projects and jobs for conventions but my main passion is crafting and art.  There is a lot of crossover in marketing and crafting surprisingly or not so surprising to some. Crafting has changed in a lot in the last 20 years and there are a lot more tools available to the consumer.

As I started to write a list of projects either self initiated or commissioned by conventions  I realized that there were a lot of ways that a crafter can help a convention.  Table decorations, giveaways,  invitations to events,  and awards can all benefit from someone who is crafty on the committee.

All of these things are great for branding the convention.  When I ran ArmadilloCon here in Austin that was an important part of the job.  T-shirts, posters, pins, BBQ tickets, website and gift baskets all were in line with the branding that I created and it makes the convention more professional and more inviting.  But it goes beyond the look of the pieces and fitting into the brand,  the items need to fit into the brand voice that has been created to convey the character of the convention.

This website is to share some of the projects I have done for conventions in the past as well as ideas for conventions in the future.  There are things I have thought about for conventions that I want to use but haven’t found the perfect use for them yet.

If you want to send me a project that you have done for your convention I am happy to share it.  There are so many different approaches to promoting conventions and so many cool projects that have already been done!